Sweeten Up Your 4th of July With These Patriotic Desserts
June 30, 2023
Posted: May 6, 2022 1:45 am


A Kentucky Derby day is a great time to engage in Kentucky’s activities. Nothing is better than enjoying a big spread of food from your favorite foods and drinks from your famous cocktail company or restaurant. However, this can become quite expensive if you are not careful about what you choose to drink or eat because most everyday items are costly compared to those offered at other events like Christmas or New Year’s Eve.
A Kentucky Derby party can be cost-effective if you eat from the more common items in everyday life. The review of these typical Kentucky Derby Recipes below is intended to provide you with at least six traditional and cheap recipes (that are easy to prepare) that you can use as a guide and pointers for your cooking preferences. Below, we’ll introduce and suggest the most popular ingredients in each recipe. You won’t have to research or purchase these ingredients specifically for a Kentucky Derby party.

One recipe will require:
A half-pound of sharp Cheddar cheese (preferably the cubed type, but rateable Cheddar will do) or Pimentos (e.g., green and red) cut into small pieces.
For the soup, one can use a large can of chopped tomatoes or more petite tinned tomatoes and two cups of milk to create a thicker consistency in the soup- if needed. The cheese and tomatoes will provide the savory flavors and need to be chopped to prevent them from being too strong.
A dozen eggs or four dozen egg whites if you prefer scrambled eggs instead of fried.
About ½ a cup of bread crumbs (preferably whole grain bread as this provides more flavor).
Salt and pepper to taste.
Chopped Pimentos or cheeses (optional) for garnish. Note: The dish works well with either red or green peppers.
Directions:
Mix the breadcrumbs and the Cheddar cheese or Pimento in a bowl. Melt one-half of the butter in a pan on medium heat. Then add all of the eggs, salt, and pepper. Once all ingredients have thoroughly combined, remove it from heat (don’t overcook). Add a cup of buttered bread crumbs to another half-pan on medium heat. Add one-half of the chopped tomatoes to this pan and stir until well combined (the remaining tomato sauce can be saved for another recipe). Once again, please remove it from heat before it has had time to boil. That is, make sure it does not make a bubble too much. Add the cheese and Pimento to the tomato sauce and stir them to create a nice smooth pimento cheese. Allow these ingredients to mix well. Pour the tomato sauce into a bowl and allow it to cool.

One recipe will require:
two cups of milk (or any other type of liquid)
a cup of flour
One teaspoon of salt.
A half-pint of melted butter (or a similar amount in terms of volume). Note: Melted butter may be best for this recipe due to its decadent richness in flavor. (2) This can be prepared by simply heating butter on medium heat until it melts and is nice and creamy. It must then be allowed to cool before being added to the mixture.
A lot of cinnamon powder (2 tablespoons). Note: This can be purchased at supermarkets or from local grocery stores.
A lot of sugar (2 cups). Note: This can be white, brown, or flavored (e.g., maple syrup), depending on your choice and preference.
Two cups of chopped nuts (optional). Note: These can include walnuts, pecans, and other standard walnut-type nut varieties. These should be finely chopped in a food processor or by hand.
One-half teaspoon of salt to season the pie later in the cooking process and taste preference applied to sweet/salty flavorings and dietary requirements (optional).
Mix the flour, salt, and sugar in a bowl. Then add the melted butter (if it is not already melted), and stir until it has thoroughly combined. Mix in the milk (or other liquid). Stir thoroughly to create a smooth batter of sorts. Stir in 2 tablespoons of cinnamon powder to spice up the flavor of the pie. Do not add too much as it can be too strong tasting. Lastly, stir in two cups of chopped nuts (add more if preferred). The pie will be ready once it looks like pie dough at this stage and is light brown (before any cooking process starts) and cool enough to touch without burning your fingers. Once this stage is reached, you can begin to cook the pie.
Place four pie tins on a baking sheet. Then pour in half of the batter (or less if preferred). To achieve maximum flavor, spread it out evenly across all pans. Use an old flat spoon or similar tool and smooth out the surface by adding flour to it. Next, add another layer of pastry on top of this. Repeat this process until all four layers have been used up and any leftover batter (this bakes two pies at one time). Then place the pie in the fridge to allow it to chill (this will make the crust of the pie much nicer in texture).
Once thoroughly chilled, please remove it from the fridge and preheat your oven to 350 degrees Fahrenheit or 190 degrees Celsius. Then place the pie tins on a baking sheet in the oven for about 30 minutes. When you remove them from the oven, allow them to cool completely on a cooling rack. Once thoroughly cooled, fill with whipped cream or ice cream and chopped nuts if desired.
3. Boulangerie Bouquet Recipe
This delicious recipe can be prepared at home by anyone who enjoys baking and making bread at home. This recipe is filled with unique flavors that make you feel like you are in a bakery.
The components of this recipe are relatively inexpensive and can be prepared in under 20 minutes. One thing that needs to be kept in mind is that this dish will take a while to cook as it requires an oven to warm up and cook properly. A good time to create this dish is when you have at least 4 hours on your hands because it can stand the test of time well with proper care. In terms of the ingredients, these are relatively simple and cheap but certainly fill the senses when it comes to flavor.
One recipe requires:
one package (or half-a-pound) yeast. Note: This can be found in any supermarket or local Asian stores. It is a type of powder that has yeast in it.
1/4 cup of sugar (or any other sweetener)
a half-pound of flour
Two egg whites (optional) Note: Egg whites are not required but will create better results in terms of taste and texture. They provide air and structure to the bread, so they are highly recommended for this recipe. If you use them, mix about one cup or 250 milliliters of liquid into two egg yolks before adding them.
A large pot for cooking the mixture Note: This can be any cooking or baking vessel that is deep enough to hold the mix. It should also be able to withstand high temperatures. Any kitchen utensils will do (e.g. microwave-safe bowls, glass dishes, etc.) as long as they can heat up to 500 degrees Fahrenheit and support the mixture once heated.
1/2 cup of butter Note: This will give the bread an excellent creamy and luxurious taste once combined and made into a dough later on.
Two tablespoons of butter (optional) Note: This can be added as a final touch to add extra taste and creaminess.
The preparation process is relatively simple and only takes a few minutes. First, place the package of yeast into a bowl with the sugar and warm water. Leave for five minutes so that it can activate in the mixture. Then whisk the mixture until it can dissolve into something similar to scrambled eggs. If it does not dissolve properly, add some more water if required until everything is dissolved into one smooth mix. Once this has been achieved, mix in half of the flour (1 1/2 cups or 350 milliliters). Then work it into the mixture. Add additional flour if necessary. Mix in the rest of the flour after this step. Once everything has been mixed in, knead for about five minutes with your hands until it is smooth and elastic. The dough should be slightly sticky but not too wet or too dry. If this is not achieved, add a small amount of water to mix in the dough more efficiently (1 teaspoon at a time).
Next, set some baking paper onto a baking sheet and place dough onto it. Then cut into four equal pieces of sizes equivalent to 7.5 x 5 centimeters (or 3 x 2 inches) each. This will help you, later on, to shape these pieces into a rectangle. Place them into the boiling water in a large pot. This will help heat the dough more evenly while being cooked. Once placed in the boiling water, cover and let it stand for about five minutes. This will allow enough time for the yeast to activate and rise and the formation of mold since this is a typical thing that happens when making loaves of bread (this is what gives them their characteristic flavors).
After this period has passed, set aside four bowls (with lids) onto another baking sheet, and fill one bowl with flour. This will be used later on to coat the slices of bread once they have been taken out of the boiling water to give them a nice crusty color. Next, place two smaller bowls containing two teaspoons each of the melted butter. Then add another bowl with one teaspoon of yeast mixed and another half-cup or 250 milliliters of water. Then, pour this mixture into an eighth-size mixing bowl containing three tablespoons and one tablespoon of sugar.
Add the yeast mixture into this and add the rest of the flour in small portions (this should be done while kneading but at a slower pace) until no more flour is added. Once this is achieved, add the egg whites in and mix it until it is even and has a smooth texture. Then pour the mixture into the final bowl containing two tablespoons and one teaspoon of butter melted. Mix them until they are appropriately combined. This will create a lovely custard paste that can be used to coat the pie pieces later on.
Once you have taken out the dough pieces after five minutes, place them on a baking sheet that has been lined with some baking paper (this will help with clean up later on), take off the scalding water, and place it back onto another baking sheet while using tongs or rubber gloves to do so to avoid burning yourself. Place into one of the bowls containing flour and coat them with it. Then place into the boiling water while stirring for five to ten seconds.
The water will bubble, steam up, and become quite hot in a few minutes. After four minutes, please remove it from the boiling water and drain. Once they are plated back onto a baking sheet, let them sit for about one hour and allow them to rise for a maximum of three hours (you can leave this for about 24 if you like). It will become soft, tender, and easier to slice if you leave it overnight. Once plated, place them in the oven and bake at 200 degrees Fahrenheit (95 degrees Celsius) for 30 to 40 minutes. This should give you a nice golden color.
When they have finished baking, remove them from the oven onto a cooling rack to cool down and dry themselves (leave them out at room temperature). When cooled, you can put each pie piece into an individual serving dish to keep them at hand whenever you wish to eat them. Alternatively, you can store these for up to two weeks if frozen and thawed before eating. It would be best to keep them frozen to maintain their texture, quality, and taste.
One recipe will require:
four cups of flour Note: This is approximately 1 lb (or 0.45 kg) of flour
one and three-quarters teaspoons of yeast (or two packets of active dry yeast)
three and one-half teaspoons of salt
Two cups of warm water (about 100 degrees Fahrenheit or 38 Celsius). Note: It is best to use a temperature-regulated pot or bowl not to burn yourself.
a large bowl for mixing everything in
a wooden spoon for mixing everything
Directions:
Begin by combining the flour, yeast, and salt in a large bowl. Stir them all together until they are mixed well. Then add the warm water and mix it until it becomes a dough ball. Cover the bowl with a damp cloth and leave it at room temperature to rise (about one hour). This will cause it to increase in size and becomes slightly soft. You can even leave this for about an hour if you wish and then put the dough back into the bowl for a second rise (you can do this as many times as necessary until your desired loaf of bread is entirely made).
Once your dough ball has been left to rise, take it out of the bowl and knead it for about five minutes until it returns to its original form. This will help you eliminate any air bubbles that may have been formed in the dough. This will also help you better the dough’s consistency and make it easier to handle from here on out.
Place your dough back into the bowl and cover with a damp cloth again. Leave this for about an hour until it has risen again.
This next step is when you will take the dough out once again and place it onto your countertop or tabletop. Then press down on it (with your hands or a rolling pin) to flatten it out and allow air pockets to form between the dough pieces. This will help the dough retain its shape when placed into the oven later.
Place your dough ball into an oiled bowl, cover with a towel or lid, and leave it to rise once again. You can leave it out at room temperature to grow as quickly as possible (this may take two hours).
Once the dough has risen, take it out and place it onto a lightly floured countertop while taking the flour off it. Then take your rolling pin and begin rolling out the entire piece of dough until you have finally achieved the desired thickness for your bread. You can roll it out to be as thick or thin as possible. You can also roll it into a square or rectangle shape, etc. This is all up to you and your preferences.
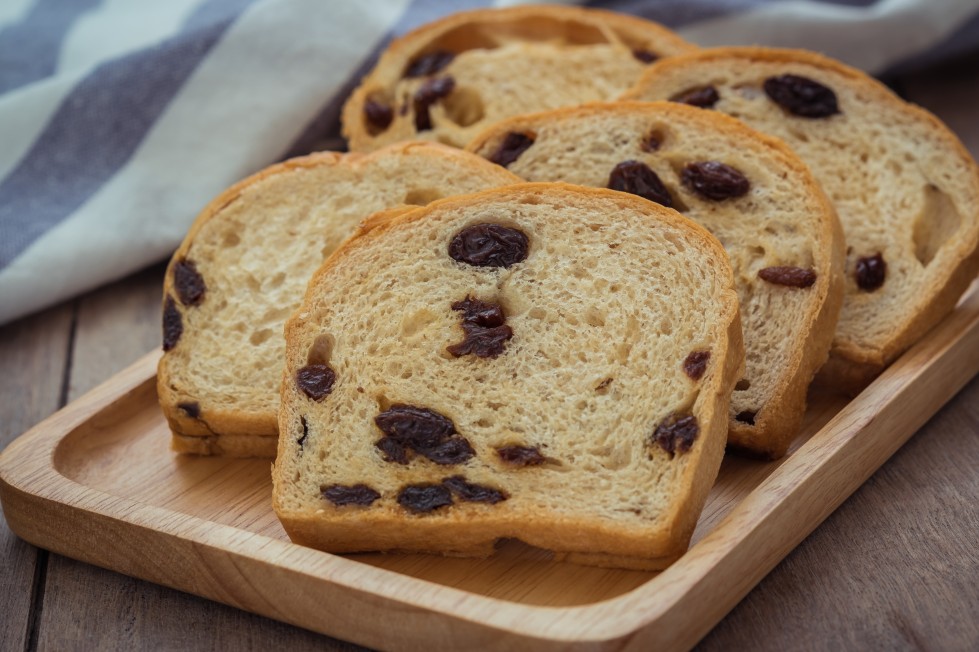
Once the dough has been rolled out, take your rolling pin and begin flattening it to make it thinner and rectangular (if you had rolled it into a square). Then take your cinnamon and sugar, place them onto the dough, and spread this evenly across it. Make sure not to put too much on, however, or else you will have too much sugar in your bread which will cause an over-powering sweetness taste.
Then take your raisins and roll them onto the parts of the dough that you have spread with the cinnamon and sugar. Then take your dough cutter (or knife) and begin cutting it into pieces, making sure that you cut each piece as close to each other as possible to maximize the amount of filling you can have per slice.
Take your loaves of bread and place them into two well-greased loaf pans. Then cover with a towel or lid to let it rise one last time until it is adequately risen and has filled up the entire pan. This can be one to two hours and depends on the ambient temperature of your home or kitchen. When it has risen enough, take it out and bake in a 400-degree Fahrenheit (204 Celsius) oven for about forty-five minutes to an hour or until they have become golden brown.
Once removed from the oven, let them sit out at room temperature for about thirty minutes before serving. This will help your loaves of bread dry correctly and become more enjoyable to eat when it is no longer warm and moist inside. You can do this with butter or margarine on top if you want it melted or solid.

June 13, 2023

May 10, 2023